How To Center Herringbone Pattern
How To Center Herringbone Pattern - 2) determine the herringbone pattern orientation in the room. 81k views 3 years ago. Web how to lay herringbone tile pattern step 1: But how do you get started with them? Web diy herringbone pattern, finding center. The true center position of a herringbone pattern. Web herringbone tile installation with layout, cutting, and installation advice so you can diy your next tile install project and get professional results. Start by measuring and marking out the area where you want to lay the herringbone pattern. Web diy herringbone pattern, finding center. Then use a trammel to mark a perpendicular line: The 90° and 45° herringbone pattern. Web once you’ve determined which direction your herringbone pattern will run, you’ll want to find the center. The true center position of a herringbone pattern. Here we provide detailed instructions on how to accomplish this layout. But how do you get started with them? 3) measure for true center on the herringbone pattern to establish working lines as shown in figure 3. Producing the streamlined, symmetrical pattern that makes herringbone so visually appealing is easy once you identify the center point of the room. Tiktok user @sydneyleanndesign recently showed off. Begin by measuring the area you’ll be working with and drawing out the pattern on the subfloor using a pencil and a straight edge. Web laying out a herringbone pattern 1) determine the diagonal dimension of the flooring. 81k views 3 years ago. The first step in laying a herringbone pattern is to find the center point of the wall. Here we provide detailed instructions on how to accomplish this layout. Web snap a chalk line down the center of the room, along its length. Web how to lay herringbone tile pattern step 1: But how do you get started with them? 3) measure for true center on the herringbone pattern to establish working lines as shown in figure 3. Web see our 2024 guide on herringbone patterns. Measure the length of the wall and mark the halfway point. Visit the official b&q youtube. Web diy herringbone pattern, finding center. Web yes, tile herringbone patterns look great. A super simple way to get started; Web find herringbone pattern tile and herringbone pattern wood floor ideas for your renovation, complete with herringbone pattern pictures from designers. This post will cover these three things: First, i’m going to assume you are using modular tile. More on this towards the end of. Use a suitable adhesive and start laying the tiles from the center of the room, working outwards. Here's what you need to know about laying it successfully. Visit the official b&q youtube. Laying a herringbone pattern is relatively straightforward, with a few essential steps to follow: Using a combo square or speed square, draw a line marking 45 degrees on the right and left side of the center mark. Here's what you need to know about laying it successfully. Web yes, tile herringbone patterns look great. From the other end, draw intersecting. Web the herringbone pattern is a classic tile layout and is a coveted design feature. Web figuring out how to lay herringbone tile is all about finding the center point. Web how to lay herringbone tile pattern step 1: Web snap a chalk line down the center of the room, along its length. The 90° and 45° herringbone pattern. Start in the corner of the 90 degree corner in the center of the piece. 3) measure for true center on the herringbone pattern to establish working lines as shown in figure 3. Therefore, we chose to start in the center above the vanity. A floor layout is different than a wall. Web figuring out how to lay herringbone tile. Web the herringbone pattern is a classic tile layout and is a coveted design feature. Web laying out a herringbone pattern 1) determine the diagonal dimension of the flooring. Then use a trammel to mark a perpendicular line: Web you will want to start in the center of the wall but in an area where the tile will be supported. 2) determine the herringbone pattern orientation in the room. Start by measuring and marking out the area where you want to lay the herringbone pattern. A floor layout is different than a wall. Credit to @customtileinstallation on instagram.more. Web you will want to start in the center of the wall but in an area where the tile will be supported. Web how to lay herringbone tile pattern step 1: From the other end, draw intersecting arcs, as shown. Web diy herringbone pattern, finding center. Laying a herringbone pattern is relatively straightforward, with a few essential steps to follow: Web herringbone tile installation with layout, cutting, and installation advice so you can diy your next tile install project and get professional. Credit to @customtileinstallation on instagram.more. How to layout and properly center a herringbone pattern; A few of our tiling experts tell you exactly how it's done and the key tools you need. Therefore, we chose to start in the center above the vanity. Web figuring out how to lay herringbone tile is all about finding the center point. Web the herringbone pattern is a classic tile layout and is a coveted design feature. You can mark the floor with a chalk line or whatever is easiest! This post will cover these three things: Web once you’ve determined which direction your herringbone pattern will run, you’ll want to find the center. Web find herringbone pattern tile and herringbone pattern wood floor ideas for your renovation, complete with herringbone pattern pictures from designers. 2) determine the herringbone pattern orientation in the room. We cover why to choose herringbone, styles, installation, and more! Web before you start setting up the herringbone pattern, it's important to prepare the surface by ensuring it is clean and even. Web looking for the centre of your herringbone pattern? More on this towards the end of. Web snap a chalk line down the center of the room, along its length.
What You Should Know About the Herringbone Pattern
DIY Herringbone Accent Wall The Home Depot
Herringbone Floor Tile Calculator Floor Roma

The Wine Crate Files Make a Herringbone Tray Wine crate, Crates, Tray

How to center herringbone tile YouTube

What You Should Know About the Herringbone Pattern
Tiling a Bathroom Wall in a Perfect Herringbone Pattern The
Herringbone Tiling Pattern A Look Herringbone Tile Pattern Variations

How to CENTER HERRINGBONE tile pattern THE CORRECT WAY YouTube
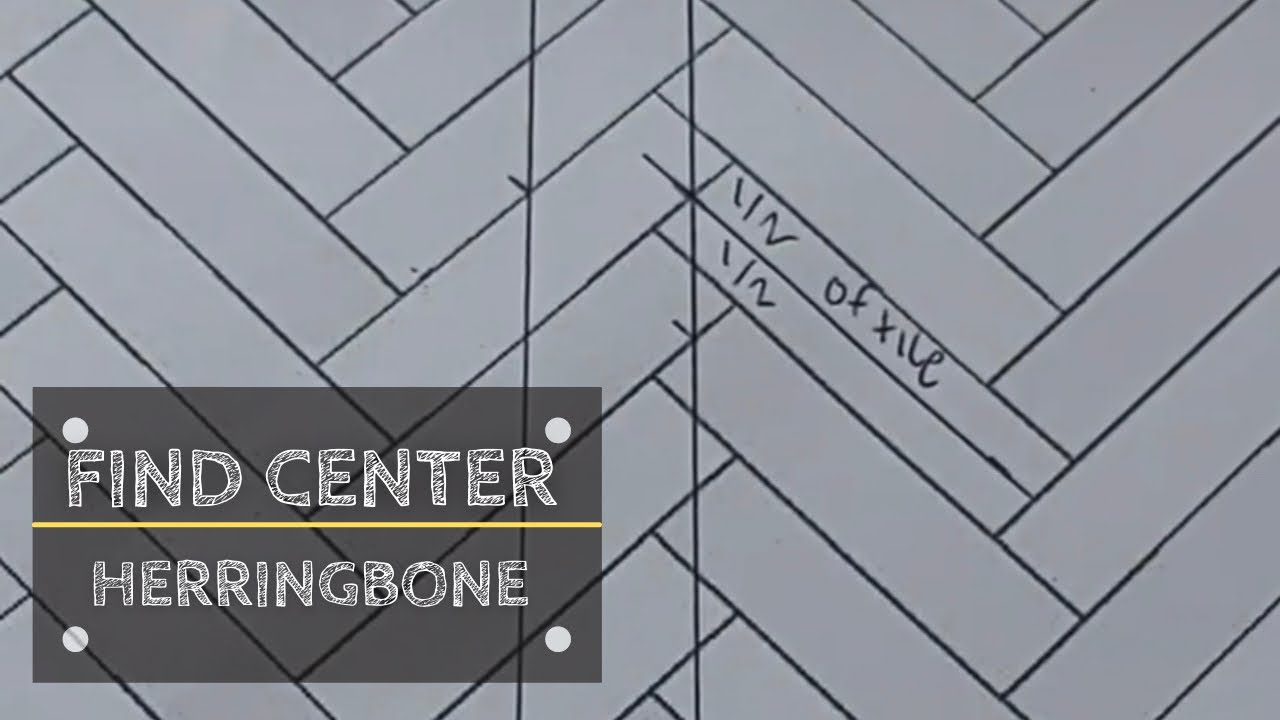
Diy herringbone pattern, Finding center YouTube
Web Laying Out A Herringbone Pattern 1) Determine The Diagonal Dimension Of The Flooring.
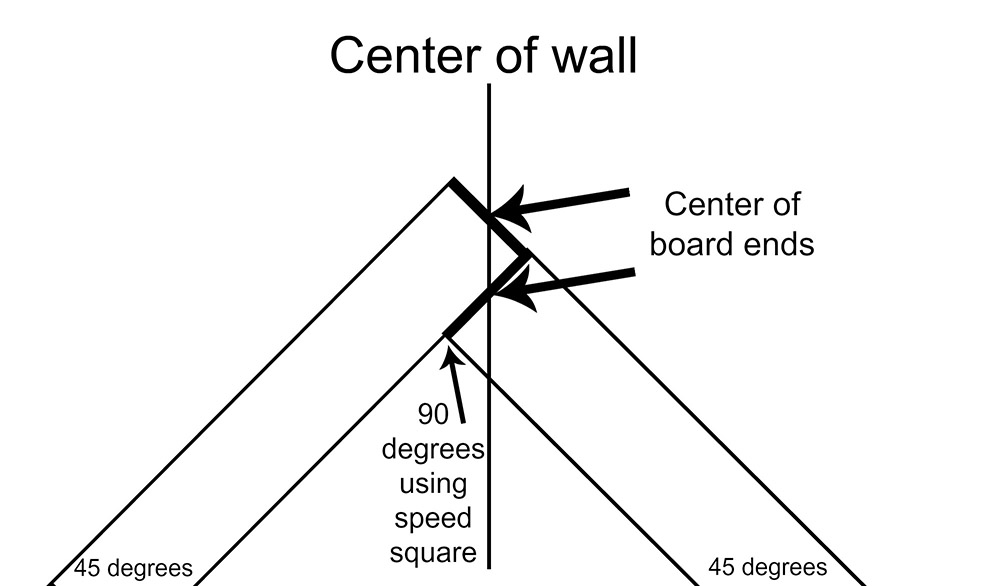
The First Step In Laying A Herringbone Pattern Is To Find The Center Point Of The Wall.
Web To Create A Herringbone Pattern, Start At The Center Point And Divide It In Half Vertically, Marking The Line With A Pencil.
Web A Diagonal Herringbone Brick Pattern Will Add Major Style And Elegance To Your Patio.
Related Post: